

How To Install And Configure Ansible On Linux
Introduction
Ansible is an Information technology automation tool intended to facilitate the management of remote servers. Ansible requires Python (version 2.seven or 3.5 and college) to run. Ansible is run from a centralized control node and can manage any server attainable over SSH. Remote servers that are managed by Ansible are called managed nodes.
By default, Ansible communicates with managed nodes using OpenSSH. SSH is non the only advice machinery Ansible supports. You tin can run tasks on the command server locally, in a docker container or fifty-fifty a Windows server. The control node will crave Linux to run.

What is Information technology Automation?
Today, System Administrators and DevOps Engineers must manage complex IT infrastructure in the cloud and across multiple sites. Modern web applications typically consist of an API service, a front-end service, and a database service. Manually managing such circuitous systems would crave a lot of time and would be prone to mistakes.
It automation uses software to provision IT infrastructure, deploy applications and, to manage services configuration changes. The software you employ to fill this role needs to provide a reliable and repeatable mode to manage your IT tasks. Ansible's approach to IT automation centers effectually the 'playbook'. You tin think of an Ansible playbook equally a recipe that describes the steps needed to set up up your It infrastructure, deploy your applications and and then configure those services.
Advantages of Ansible
Ansible is very like shooting fish in a barrel to learn and allows you to become upwards and running with automation more quickly than other tools. Ansible is agentless, then you don't take to install and maintain an Ansible client on your managed nodes. This dramatically simplifies the management of Ansible updates.
Drawbacks of Ansible
Ansible, of course, is not a perfect tool. If an SSH connection is interrupted partway through a playbook run, that node could cease up in a partially configured state. Ansible also has a reputation for beingness slow and may require additional performance tuning to run across your requirements.
Pre-Flight Check
Earlier we begin, we'll need root access to a pair of servers running CentOS 7. I'll be using two Liquid WebSelf-ManagedPrivate Cloud Servers throughout this article. Our first server, which I've named Control, will act as our command server. The 2nd server, designated as a Node, volition exist our first Ansible managed node. We can get started, bold you accept SSH admission to both CentOS 7 servers.
Install Ansible
Step 1: Update your Control Node
Any time you are installing new software, it is a good idea to ensure your existing operating system software is upwardly to engagement. Let's start with that task first.
yum update
Stride 2: Install the EPEL Repository
Installing Ansible is pretty straightforward. First, we'll demand to install the CentOS 7 EPEL repository.
yum install epel-release
Footstep 3: Install Ansible
Adjacent, we install the Ansible package from the EPEL repository.
yum install ansible
Step 4a: Create a User for Ansible
As security best practice denotes, information technology is a good idea to avoid logging into your Linux servers as root. We will create a non-root user on our control node and our managed nodes that will run our Ansible playbooks. This user defines the admin Ansible will apply to log into our managed nodes. Here nosotros take used "admin"' for the user, just any username can be substituted. To follow forth with our examples, you will desire to use the aforementioned username on both the Control node and our managed Nodes. Log onto the command node to add together a user and set a password.
useradd admin
passwd admin
Log onto the managed node, add together the admin user, and set up the password.
useradd admin
passwd admin
Footstep 4b: Configure the Control Node User for Passwordless Super User Access
On the managed node, nosotros demand to ensure our Ansible user tin can utilize the sudo command without a password. Run the following command to open the sudoers file for editing.
visudo
Type 'i' to enter input way and add together the post-obit to the end of the file. Blazon '[ESC]:wq' to save your changes.
admin ALL=(ALL) NOPASSWD: ALL
Stride 5: Configure our Admin User for SSH Admission
We need to ensure our admin user can access the managed node over SSH without a countersign. We will prepare up an SSH key pair to let this. Log onto the control node as the admin user and run the following command to generate an SSH key pair. Note: Just hitting enter at the prompts to accept the defaults.
ssh-keygen
Now nosotros can copy the public key to our managed node with the post-obit command.
ssh-copy-id node.kb.liquidweb.com
Step vi: Create an Ansible Inventory
Ansible requires an inventory list and so it can identify your managed nodes. To add our managed node to the inventory, we demand to login to our Control node as the admin user. Next, we will add together a new inventory file. Brand sure you are logged onto the Command node every bit the admin user.
vim /home/admin/inventory
Type 'i' to enter insert mode and add the managed node hostname to the inventory file.
node.kb.liquidweb.com
Next, type '[ESC]+:wq' to salve the file.
Step 7: Create an Ansible Playbook
To test our configuration, we will create a unproblematic playbook to install Nginx on our managed node. Showtime, we will create and open a new file. File names are non specially important as far as Ansible is concerned. You should, of form, use descriptive file names. Make sure you are logged onto the command node every bit the admin user.
vim /habitation/admin/install-nginx.yml
Ansible's playbooks are written in a language chosen YAML. YAML is intended to be human-readable. Looking at the text below, you should be able to tell what the expected results are. I'll suspension the syntax downwardly in just a moment, but for the time being, blazon 'i' to enter insert mode and add together the following text to your playbook. And then type '[ESC]+:wq' to save and exit.
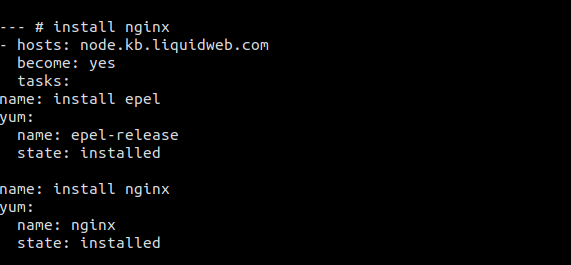
Ansible's playbooks execute 'plays'. A play is a list of tasks that volition be performed on the nodes. In the example above, we used the 'hosts' keyword to specify a list of but a single node. You tin can, all the same, specify a list of hosts, using comma-separated values. To install software with Ansible, we require root access to utilize yum. We use the keyword "go" in the play to instruct Ansible that the root user is required to execute the task.
The 'tasks' keyword initiates the list of tasks to be completed. Each task is given a unique name using the 'proper noun' keyword. We then use the yum module provided past Ansible to install the first epel repository, so we use the second entry to install nginx.
Step 8: Run the Playbook
Running a playbook is rather easy. We use the "ansible-playbook" command and then specify the inventory file with the "-i" option followed past the path to the playbook. Make sure you are logged onto the command node as the admin user.
ansible-playbook -i /home/admin/inventory /home/admin/install-nginx.yml
Determination
We've just scratched the surface with Ansible then far. You can group the servers in your inventory together past using group names. This grouping allows you to execute playbooks on only your webservers or, only on your database servers. Y'all can also run advertisement-hoc commands. Ad-hoc commands are tasks that you need to run simply once. For case, if you needed to reboot all of your spider web servers. All in all, Ansible is an fantabulous tool you can use to save fourth dimension, coin and endeavour to automate tasks across a single or multiple remote servers.
Subscribe to our Knowledge Base today for future articles and updates discussing these topics and more! Get started with Ansible today on a Liquid Web Deject Server. Give usa a phone call (800.580.4985), open a ticket at back up@liquidweb.com or, beginning a chat with united states of america and ane of the Most Helpful Humans in Hosting and would exist happy to help y'all get started.

Source: https://www.liquidweb.com/kb/how-to-install-and-configure-ansible/
Posted by: nelsonfrored1945.blogspot.com
0 Response to "How To Install And Configure Ansible On Linux"
Post a Comment